Friday 31 July 2015

The First Ever 'Beauty Cereal'

I'm always up for trying innovative products, especially when they are a little bit different. So when I was offered the chance to try the first ever 'Beauty Cereal' I was more than intrigued. The Believe Beauty Breakfast* has just launched into Wholefoods, but what exactly is it?


Well it's a breakfast cereal, that you treat like any other cereal but it's been created for your skin, hair and nails. It's packed with ingredients that give a kickstart to your beauty regime. There's granola and British honey toasted oats, so you're getting a wholesome breakfast that keeps you full all morning. There's also coconut, sun dried blueberries and cranberries, which makes it really tasty, it certainly does not taste like sawdust like some other granolas. The granola has been made into clusters and they've been blended with 17 vitamins, including vitamins A, B12, B3, B5, B6, vitamins C, D and E plus zinc, selenium, magnesium and biotin.

What I found particularly interesting is comparing the calories of this to other cereals on the market. I suspected that it might be quite high, which would defeat the point of filling your body with good vitamins. It's actually comparable to other cereals on the market! It's the same calorie consumption as Kelloggs Crunchy Nut and the Jordan's Crunchy Oat Granola. 


You can tell this has been made with the beauty world in mind, as the packaging is gorgeous. I love the purple colour theme and it has some really pretty gold detailing. I have to be honest and say that cereal is not normally my thing, in fact I normally hate it. However, I've really enjoyed eating this! You can eat it with milk like a regular cereal, you can mix it with yoghurt, but I actually even like eating it on it's own.

The cereal retails for £4.50 a packet here, which is for 450g. This makes it a bit pricey than other cereals on the market, but this is a bit unique. I'd recommend mixing it into your routine, by having it for breakfast a couple of days a week. That way you get the benefits of the nutrients without a huge price hike to your shopping bill.
Share:

Thursday 30 July 2015

The New Trend: Strobing

You may have noticed that there happens to be a new trend taking the world by storm. It's called 'strobing' - but what exactly is it?


Strobing is dubbed to be the 'natural contouring' method, whereby you ditch the bronzer and make full use of your highlighter. It's all about embracing your dewy skin and creating shine and glitter all in the right places. It's also designed to be a much faster way to contour. So it's one if you're a little time stretched, or you just happen to be a little bit lazier in the mornings. Instead of faffing about with two products and a lot of blending, you're just using highlighter. Better yet, more is more! 

To add the new strobing trend into your routine, start with a dewy base. I'm a huge fan of the ESPA Naturally Radiant Tinted Moisturiser, which I've spoken about plenty of times before. It gives your skin a good amount of coverage and it leaves your skin glowing! If you do not have any dewy bases, you could mix a bit of the Good To Glow highlighters from Rimmel London into your normal base. You then want to find your favourite highlighter, you can't go wrong with something like the Mary-Lou Manizer from The Balm. Normally I'd say you want to be careful with this highlighter as it's really pigmented, but this is the strobing trend! Apply a generous amount to all the normal places; cheekbones, the middle of your nose, your brow bone and the corners of your eyes. If you overdo it, you can always dab your foundation brush over the top of the highlighted areas, to dull it down a little.

I'm a huge highlighter fan and as much as I love contouring, I'm all for trying this new trend. What do you think of strobing? Gorgeous glowing skin, or too much like a glittering disco ball?
Share:

Wednesday 29 July 2015

The Makeup That Survived 39 Degree Heat

Whilst on holiday recently we had some pretty extraordinary weather. In fact, when we were in Washington DC, the temperature reached a whopping 39 degrees. If I'm honest, 39 degrees is too hot for makeup, but when you're taking lots of selfies you want to look your best. I tried a lot of makeup combinations and sadly, a lot of foundations and products really let me down. However, I did find a winning combination that gave me perfect makeup all day long.


I started every single day with a full cleanse, SPF and sweat can play havoc with your skin if you're not careful. I was cleansing with Vichy Purete Thermale Fresh Cleansing Gel, and then spraying Serozinc all over. Once Serozinc had soaked in I was applying the Vichy Aqualia Thermal Dynamic Hydration Power Serum. This serum is incredible for dehydrated skin, perfect for recovering after high heats and long haul plane journeys. Then I was applying my moisturiser, which is the Garnier Pure Active Moisturiser which is great for combatting blemishes. 

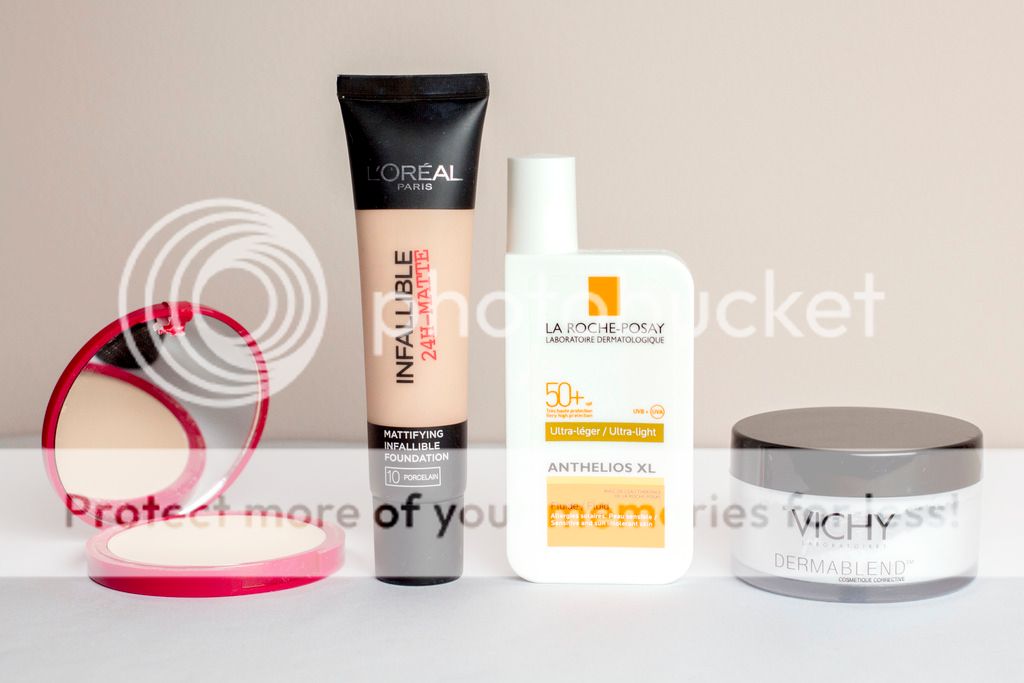
After a full cleanse it was makeup time, and I started with the most important step; SPF. The SPF I've recently falling in love with, is the La Roche-Posay Anthelios XL Ultra Light Fluid. It's a formula containing 50SPF+ and let me tell you, my skin didn't burn once in three weeks. It's quite the achievement! 

So, onto the actual makeup! My foundation of choice was the Mattifying Infallible Foundation from L'Oreal, it was the only one that didn't let me down. It didn't melt, smudge, crease, it just stayed in place all day. I topped the foundation with the Bourjois Healthy Balance Powder, it's an incredibly fine milled powder which adds a bit of coverage and keeps shine at bay. I would then apply blusher, bronzer, waterproof mascara and eyebrow pencil and top it all with the Vichy Dermablend Setting Powder. I've been using the Vichy setting powder for ages and it's just phenomenal at setting your makeup, I've never seen anything quite like it. 

This combination really kept my makeup in place all day, which made me incredibly happy. Nobody wants foundation melting off your face when you're at the top of the Empire State Building! 
Share:

Tuesday 28 July 2015

How To Use Your Digital SLR In Manual Mode

People always tell me that they have a Digital SLR camera, but they use the camera in automatic mode as they are not sure how it works. Although, you can get fantastic results in automatic mode, you can really get a lot more from your camera if you tinker with the settings. 

Before I get started though, I want to point out a couple of things! First of all, you don't NEED a SLR camera if you have a blog. The picture below was actually taken on my iPhone, an SLR is a huge investment. I only have mine as I work in the video/photography industry, so I needed it for university and work. My second point is that I'm in no means suggesting that I'm camera professional, or that my pictures are perfect. This is all knowledge I've picked up from blogging and working!


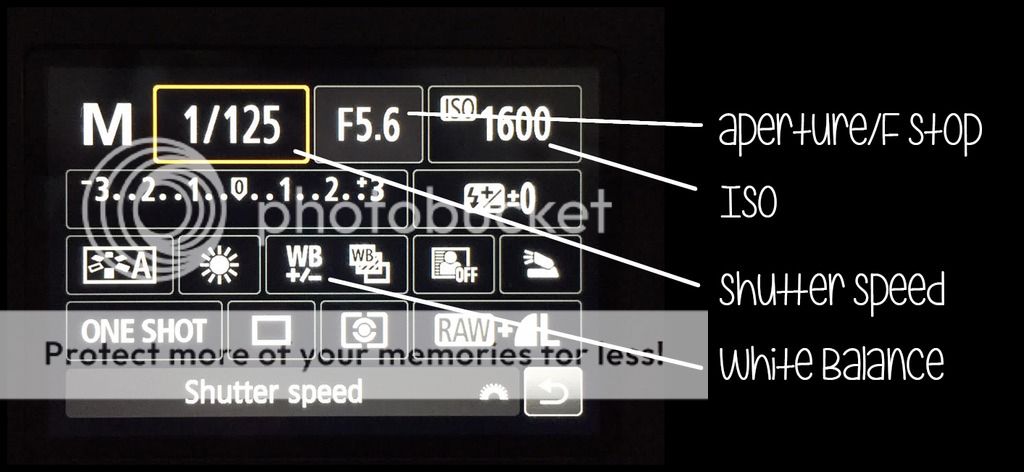
So you stick your camera into manual and you've got a whole load of options to choose from and tinker with. My camera is a Canon 650D, lots of Canon cameras will have identical settings to mine, but if you use a different brand, you're likely to have the same options too. If you've played with the settings before on your camera, you might want to restore to default settings. 


ISO - how much light do you want to let into your lens?
The ISO on your camera controls how sensitive your camera is to light and essentially how much light you let into your lens. The lower the number, the less light you're letting in. I often find that the 'golden' number for me is 400. If it's a particularly bright day I can get away with 200 and if it's dark I need to up it to 800. Beware of placing your ISO above 800; a high ISO makes your image more grainy and blurry. Tinker with this until you have the level of brightness you need, change as appropriate. 

Aperture - how much of the scene do you want to be in focus?
I'm a huge lover of depth of field and I like to tinker with this option quite a lot. The Aperture or 'F Stop' refers to how much of a picture is in focus. It's the setting that has a letter F in front of it, eg. F5.6. If you're taking a picture of a product and you want the background to be blurry, this is the setting you should change. A small F Stop (eg. F2.8) means that the subject or product stands out and the background will be blurry. A large F Stop (eg. F11) means that the whole scene will be in focus. 

Shutter speed - how long does it take for the camera to take the picture?
This is an option that I basically never tinker with, as once you've found your perfect setting you rarely need to change it. Certainly with beauty photography anyway! The numbers here refer to how quick/slow the 'shutter speed' is on your camera. This basically refers to how quickly your camera takes the picture. If the shutter speed is too slow, it will let in a lot of light, but you're likely to get a blurry photograph. If it's too fast, you won't get enough light into camera. Most of the time, the default option is perfect for beauty photography. If you've tinkered with this before, try changing it to something 1/125.

White balance - does white look white?
When you put your camera into manual, you often have the chance to adjust your white balance. White balance refers to the colour balance and essentially how your camera is interpreting white. Most of the time on automatic, your camera is actually too blue or too orange. White balance is incredible important with beauty photography, as you want your colours in the products to be true to what they actually are. It's easy to adjust your white balance, grab a piece of white paper and adjust the settings until the white paper looks white. This time the settings are likely to be words like 'sunlight' or 'cloudy' - I find that these normally have no bearing to the actual weather, so don't be put off. 

I really hope you find this useful, let me know in the comments below! If you have questions on any other settings, leave them in the comments below or tweet me (@hopefreedomlove). 
Share:

Monday 27 July 2015

Escentual Haul

There are several websites that I have bookmarked for beauty purchases and Escentual is one of them. They stock everything from skincare, to haircare, to fragrance, so it's a good place to pick up your essentials (excuse the pun). At the moment they've got an offer on which saves you 20% across the whole site, so I had to place an order.


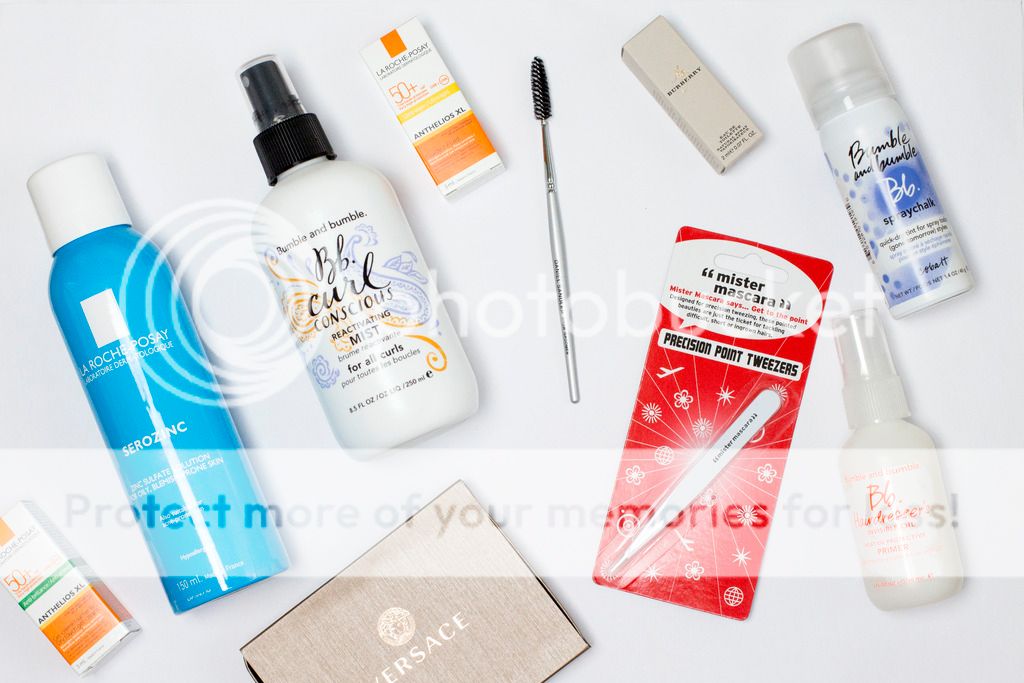
In my shopping basket first of all was Serozinc, which is a product I use everyday and I swear by it. It's fantastic at keeping blemishes and other skin problems at bay. Escentual have a duo-pack for £10, which saves you heaps of cash! Next up I wanted to have a backup of the Bumble & Bumble Curl Conscious Reactivating Mist. It's become a staple in my haircare routine and I cannot imagine living without it. It's quite pricey for a hair product, so I nabbed the chance to save 20%. When you purchased Bumble & Bumble products over £20 you received two freebies; the Cobalt SprayChalk and the Hairdressers Invisible Oil. They are both miniatures but both really decent sample sizes which is great.

I also picked up two items which were impulse buys. The Mister Mascara Tweezers Precision Point Tweezers were reduced to £2.99, I've wanted to try a pair of point tweezers for ages so popped them in the basket. I also picked up the , because I've actually lost my old spoolie Daniel Sandler Brow Groomer Brush, so I needed a replacement. I've heard nothing about either of these products, so I'm looking forward to trying them.

You can see by the picture that I was also sent a ton of miniature freebies. Who doesn't love a sample of a product?! There are two La Roche-Posay Anthelios XL products, a mini Vichy Ideal Soleil BB Tinted Velvety Cream, a sample of the My Burberry Eau de Toilette and THREE mini Versace samples.

If you're ever stuck with decisions on what to buy, the girls who run the Escentual twitter handle are fantastic. They also have an amazing blog, which is constantly refreshed with fresh, engaging content. (This sounds sponsored, but it isn't! I honestly think this brand does social media so well!) Just tweet them a question and they usually come back to you within the hour, it's amazing! Check out the site here, I'd love to know what you have your eye on
Share:

Sunday 26 July 2015

My Little Box June vs. July


As I’ve been on holiday for a little while, I’m a bit behind on my favourite subscription box – ‘My Little Box’. So I thought I would bundle June and July into one handy blog post with a little comparison review. As I’ve mentioned before, I’m in a bit of a rut with beauty boxes, and I feel like they need a bit of a shake up. There was a time when I had four subscriptions on the go, but now only My Little Box remains. What I like is that their boxes are a little bit different, everything is very cute, they feature some lovely artwork and even some lifestyle items.

My Little French Riviera Box (June)
This box is simply gorgeous, a sailboat sits on the ocean filled with little fish, the actual boxes from My Little Box are works of art. Inside the box we have two lifestyle items and three beauty items.


The first lifestyle item in the box are some super chic sunglasses from Sarah Lavoine, an interior designer. They are round lens in a matt, retro purple shade. The second item is a pair of planters, which you can use for your plants, but you can also use them for pens, makeup and other cute things.

The three beauty items are a bit of a mixture too. First of all we have a gorgeous blue nail polish that Sarah Lavoine picked out herself. "A deep blue with a touch of green, as if we had just dipped his fingers into a lagoon, there's my timeless colour". This is going straight on my nails, it’s gorgeous! You can learn more about it at www.loved-by.com. The second beauty item is a product from Kérastase, which is a brand that has featured before in My Little Box. This is a treatment which aims to tame your frizz or unruly hair. The last item is ‘Happy Exfoliation’ which is made by My Little Beauty, it’s a gorgeous sea salt scrub, perfect for prepping for a summer tan!

My Little Road Trip Box (July)
July’s My Little Box is dedicated to the road trip, making sure you have everything you need for your up and coming holiday. Once again, it’s a box packed with beautiful items. Inside there are three beauty items and FOUR lifestyle items, so it’s packed!


First up lets look at the beauty items! There’s a bottle of my favourite micellar water the Garnier Micellar Cleansing Water – it’s one of the super cute miniature bottles. I’ve been obsessed with this recently as I took one on holiday with me. There’s also a full sized Essie nail polish, unfortunately mine is in the shade Vices Versa, which is bright neon green. I’m not quite sure when/how I’ll make use of that shade, but I’m going to make it my mission! The last beauty item is the Summer Sorbet by My Little Beauty. It’s designed to be a post-sun cream, designed like an after sun to rescue your skin from sun exposure.

The lifestyle items include a Travel Organiser, which is a plastic wallet to keep your money, tickets, paper souvenirs and passport all in one place. Very handy! The next two items are from BIC, one is a handy pen from their Cristal Stylus range. The other is what My Little Box call ‘Postcard 2.0’ – a little mini notebook that you fill with memories from your holidays and post to a loved one. If all that was not enough, there’s also a mini pack of golden temporary tattoos.

So the question is, what is my favourite box? For once it’s actually a tough question, as I feel like these are the two best boxes we’ve had in a while. However, my favourite is definitely the July box, it’s packed with things I can actually make use of. I also feel like it’s been designed so well, everything works together and makes logical sense to the theme.

If you’re interested in trying My Little Box, you can subscribe here for £11 and £3.95 P&P.
Share:

Saturday 25 July 2015

Products I've Recently Finished

Blog ideas come and go, but one thing I really enjoy writing about, are the products that I've finished. Empties posts are also among my favourite posts to read too; I honestly feel that if you've used a product to the end, you are pretty well placed to have an opinion on it. So without further rambles and digressions, lets get down to business! What I particulary like this month, is that there are a few different products in the mix.

Redken Curvaceous Full Swirl Serum
This serum is fantastic if you have curly hair that sometimes needs a little bit of encouragement. You use this when your hair is wet, scrunching it through your locks. You then get very pretty curls, with very minimal effort. What's also great is that you can use this on dry hair too, without getting into a sticky mess! This is the second bottle of serum I've finished and I'm definitely restocking. It's available from Look Fantastic here for £16

Garnier Pure Active Moisturiser
This is a reoccurring product in the empties hall of fame. It's my go-to moisturiser and it's perfect for those with oily and blemish prone skin. It's really cooling as you apply it to your skin and it only costs £3, bargain! You can pick this up from Superdrug here (you can also get it in Boots, Tesco, Sainsburys etc).

Seche Vite Top Coat
I've tried a lot of top coats in my time and few things come close to Seche Vite. This is definitely the holy grail of top coats for me! I recently repurchased this and it's blown me away all over again. There is a reason that this is raved about so much - it's just unbeatable in the nail world! You can buy it from Boots here for £9.

The Body Shop Frosted Cranberry Hand Cream & Shower Gel
You can see here that I fell in love with the Frosted Cranberry scent during the Christmas season. Lots of people bought me goodies for the range as Christmas presents, so I've been enjoying the scent until now. The shower gel is as good as all Body Shop shower gels, it really foams up and the scent lingers all day. I kept the hand cream in my drawer at work for when I needed a little pick me up. It dries quickly and it actually fills my office with a lovely fruity scent! I hope The Body Shop brings this back this year (hint hint).

La Roche-Posay Physiological Cleansing Gel
I'm gutted that I've come to the end of this beauty as my skin loved it! This cleanser is incredibly gentle, it's not scented and it doesn't strip your face. It just leaves your skin feeling clean and plump. It kept blemishes at bay and also kept redness at a controllable level too. I'm definitely going to be repurchasing this in the near future, as I really miss it in my routine. 

If you have any empties posts I'd love to read them, leave me a link in the comments section below! 

Share:

Friday 24 July 2015

Adoration by NARS

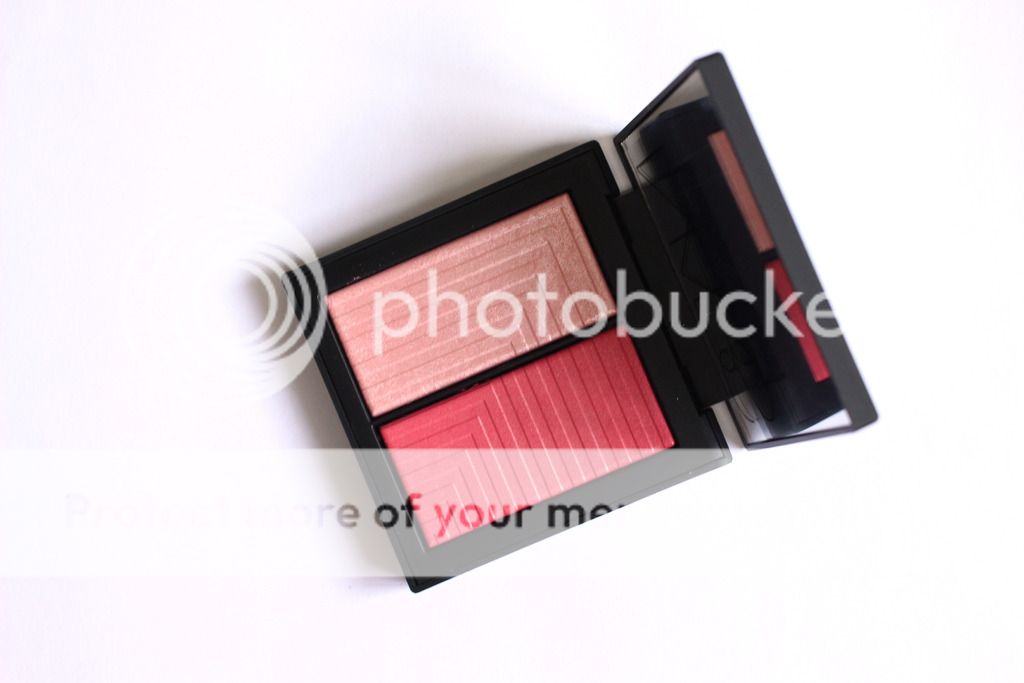
When the Dual-Intensity blushers from NARS first launched, I remember being sucked in. They looked gorgeous, I loved the colours, I loved the embossed pattern, I loved everything. I'm actually surprised that I lasted so long before I caved and picked up Adoration from Space NK


I chose Adoration as my chosen shade, as I felt like it was the shade I get the most use out of. I'm a big believer in seeing makeup as an investment (is that crazy?!). So if I'm buying a high end item, I want it to be something that I will get a lot of use out of. The special thing about these blushers is that the have a wet/dry formula, which allows you to get a different finish. For a healthy glow (my personal favourite) you use the colours dry, but for a more dramatic effect use the colours wet.

The blusher has two sides; there's the bright pink blusher (shimmering hot pink) and the light pink highlighter (sparkling baby pink). As the names suggest, both of these shades have a hint of glitter. The colours are pigmented; just a swish of the brush in the highlighter gives you the colour you need, and with the blusher it's practically a dap in the colour.

The compact is still the gorgeous matt black design, but it's a little different to their usual packaging. First of all the compact is square, it doesn't have rounded edges and the lid is held in space by a magnetic strip. I love this design, much more than the normal NARS packaging, which I didn't even think was possible.

I'm honestly so happy with this blusher and I think it's well worth the money. Mainly before I prefer the formula of this to all my other NARS blushers, which is saying something. These blushers retail for £30 from SpaceNK, which I think is quite pricey. However, I think as a little treat they work, they are something a little bit special.


Share:

Thursday 23 July 2015

Thursday Tittle-Tattle #8

'Thursday Tittle Tattle', is a Hope, Freedom, Love blog series dedicated to breaking news of the beauty world. From time-to-time, Thursday’s blog post will be dedicated to news. I'll feature beauty and lifestyle news, events, discounts, and even a bit of fashion news thrown in too! Here are the things that caught my eye this week:


The Bloggers Planner
From the minute I saw this I could not get it out of my head. A planner that has been made for bloggers?! This is my kind of heaven! I've been looking for some kind of notebook or organiser to suit my blogging needs for ages. These are a little more expensive than what I was looking to spend, but I think it's going to be a great addition to my blogging routine. I opted for 'The Bloggers Planner' in the mint shade from the Sorbet collection. The planner features; monthly quotes, monthly ideas space, weekly view, content planners, stats tracker, wish list tracker, favourites tracker, you name it - it's there! You can check out the planners here.

Illamasqua Dusk Collection
Illamasqua have announced their brand new 'Dusk Collection' and it looks gorgeous. There is a whole range of products from blushers to palettes and from eyelashes to lipsticks. I love the look of the sculpting palette

Selfridges Summer Beauty Box
Selfridges have revealed this years summer beauty box and I happen to think it's the best one yet. Once again it's a limited edition box featuring £175 worth of products, retailing for £40. There are some incredible brands and products inside, including a NARS lip gloss, Tangle Teezer, Urban Decay Setting Spray, Nails Inc Gel Polish and even an Alphabet bag. You can check out the box here!

Save 20% at Escentual
Right now you can save 20% across the whole of the Escentual website, just enter ESCENTUAL20 at the checkout. I could not resist placing a cheeky order, so I stocked up on Serozinc and my favourite product from Bumble & Bumble. Offer ends on August 18th, so don't hang around too long!

Liberty The Art of the Scarf Collection
Liberty are currently celebrating their 140 year long history with scarves. In celebration, they’ve created The Art of the Scarf collection. Liberty has taken some of their most famous prints and splashed them with famous motifs. You can learn more about the collection on their website here. It’s uber cute as you walk a little sausage dog called ‘Arthur’ through their gallery

Origins Now Available at Look Fantastic
I was so excited when I heard this news! Origins is now available to purchase at Look Fantastic! I'm a huge fan of Origins, especially their Clear Improvement Mask and their Zero Oil Toner. I'm looking forward to stocking up whilst doing my regular Look Fantastic shopping.

Batiste Launches Styling Product Range
If you love Batiste Dry Shampoo, you're bound to love the news that they've released a styling product range. The range includes hairspray, frizz taming products and even a shine spray, amongst others. You can read more about the range here

Topshop Summer Beauty Campaign
Topshop have just launched their summer beauty campaign, which is all about how to get that summer glow. In celebration of their campaign, they are offering you the change to bag a free mascara with you buy two makeup items. The offer has launched today and runs for ONE WEEK only

Boots Payday Offer
Every payday Boots release a special offer discount code, so if you're planning a splurge keep reading. You can save 10% when you spend £75 by entering JLTG75 at the checkout.

Christmas in July
If all that wasn't enough there is also a ton of Christmas news which is super exciting. It's all been floating round Twitter and Instagram, but I do feel bad talking about Christmas already. However, I couldn't resist one cheeky mention! The Charlotte Tilbury Advent Calendar, YEP, you heard right. 

Share:

Wednesday 22 July 2015

Formula X – The System

I’ve had my eye on ‘The System’ from Formula X for longer than I can remember. It’s been featured on lots of blogs and in loads of videos, so I was desperate to give it a go. The main issue was that it’s hard to ship nail polish in the US, as it’s considered Hazmat, so I had to wait to I could pop into an actual store. Whilst in the Times Square store in New York, I caved and added it to my basket. You’ll be pleased to hear that I have no regrets!


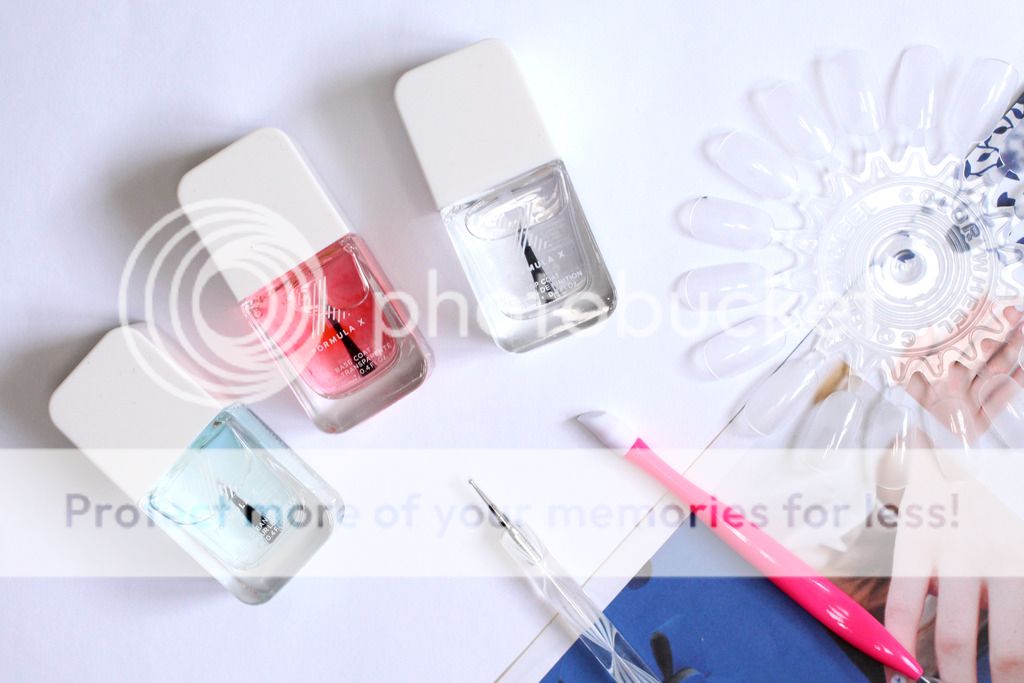
The System is a four-piece manicure kit, which is designed to give you everything you need for an at-home manicure. In the box you get three nail bottles and then you get to choose any colour you like to complete the set. I spent way too long debating what colour I wanted, but in the end I settled on ‘Outrageous’, which is a gorgeous lilac shade – more on that another time.

The first bottle in the kit is the ‘CLEANSE’ nail cleaner, which is essentially a nail polish remover. It’s infused with witch hazel, vitamin E and cucumber extract. It’s designed to remove any residue from your nail. It’s pretty easy to use, you just brush it on and wait for it to dry, which is basically instantaneous. It leaves your nails squeaky clean, my only issue is that my nails looked really dry and brittle after using it. So I’m not sure if I’m going to follow this step every time!

Next you have PRIME, which is the base coat! Formula X say that it’s a multi-tasking base coat, as it’s preventing staining, protecting the nail and then adding as an adhesive layer. Again, the base coat meets all of its claims! At the weekend I tested this with a bright blue polish and it left no staining or colour on the nail. It also dries really quickly, which allows you to speed through your manicure, which is a must for me!

Last but not least, we have SHINE, which is the top coat. I will say now that it takes a lot for a top coat to impress me. Most I’ve tried really full short of what I think a top coat should do, but this is fabulous! It applies like a dream and it dries so quickly, it also leaves a high-shine glossy finish, which is beautiful. Once it’s dried the colour doesn’t smudge and I don’t get any push back on my nails either.

All in all this is an impressive little kit! It retails for $32, which includes the free nail colour (which is worth $12 alone). With the exchange rate and all, it’s very reasonable and not too pricey at all. I highly recommend picking a set up if you have the chance!
Share:

Tuesday 21 July 2015

Notes From My Holiday: Washington DC

A whole week has gone by since I returned from my holiday. We went on a bit of a whirlwind tour of the East Coast of America; Washington DC, Ohio for Cedar Point, Niagara Falls, Boston and New York City. I thought I’d share some of my holiday snaps with you all over the coming weeks, which I hope you will enjoy. I personally love looking through people’s holiday snaps. I’m going to move through the holiday in chronological order, starting with Washington DC.


Washington DC is of course home to The White House, but it’s also home to a whole host of memorials, monuments and museums. It’s practically the ‘three M’s’ that make up the whole place. I actually thought that Washington DC would be hideously tourist focused, but it was actually one of the better places we visited.

We started off at The White House and then went for a walk to the WW2 Memorial and then The Reflecting Pool, probably my two favourite places in the whole of Washington. It sounds weird, but water is probably one of my favourite things, lets be honest, it does make for a pretty picture too. I should add that the whole time we were in Washington it was between 35 and 39 degrees, which meant it was blisteringly hot.


The next day we went on a tour of all the different memorials and monuments in Washington. My three favourites being The Martin Luther King Memorial, The Vietnam Memorial and The Korean War Memorial (the one with the statues in the grass). It was Father’s Day, so hundreds of people had left roses at the Vietnam Memorial in remembrance, it was very pretty but incredibly moving.


Washington DC is home to the Washington Monument (the long tall thing that looks like a giant pencil) and it can be seen from practically anywhere in Washington. It makes for a particularly pretty picture almost everywhere you go.


Whilst we were in Washington we also visited The Capitol Building, which is home to the United States Congress. It was actually under construction when we were there, which meant we couldn’t see all the pretty painting on the Rotunda. However, we did visit the both the houses and had a listen to the debates.


One thing I particularly recommend if you’re visiting Washington DC, is the Holocaust Museum. It’s literally packed with history and stories about the Holocaust and I learnt a lot whilst I was there. We also visited The International Spy Museum, which is much more light hearted, you get to test your spy skills! However my favourite museum type place was the Bureau Of Printing & Engraving, where they print all the US money - no pictures allowed inside though I'm afraid! 
Share:

Monday 20 July 2015

Shopping In The USA

I recently spent three weeks in America, lets be honest, shopping was bound to happen. I actually feel like I was pretty restrained, but I definitely picked up a few things.


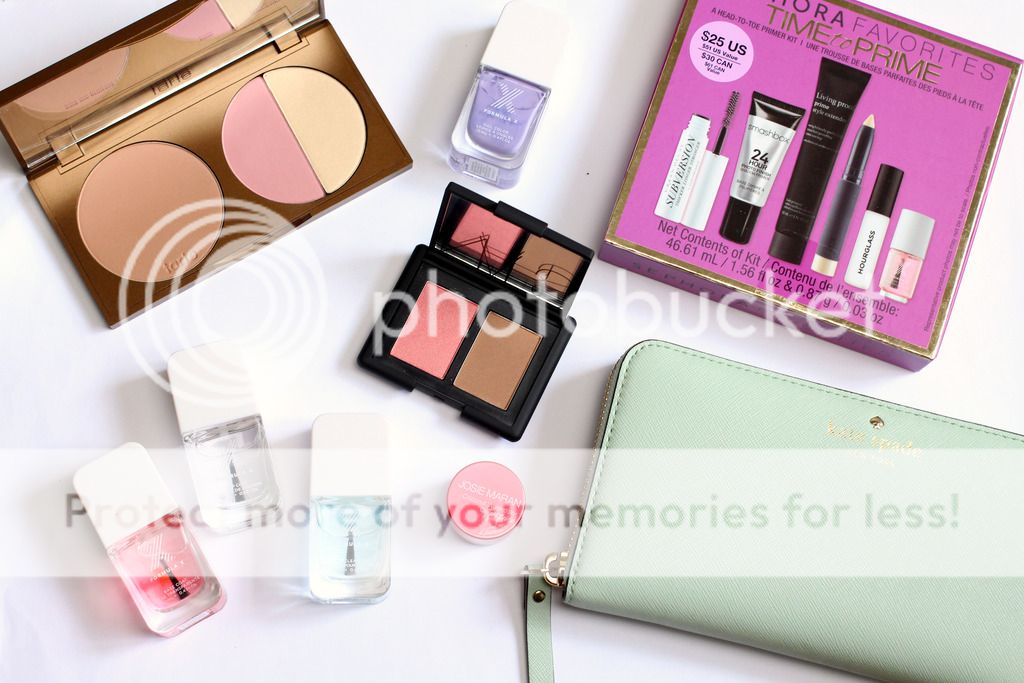
First on the list is something I picked up from Ulta in Ohio with one brand in mind – Tarte Cosmetics. I browsed the Tarte counter for quite some time and I eventually decided on the ‘Park Ave Princess Contour Palette: Volume II’. It’s a handy contour shade with three products inside, there’s a blusher, a highlighter and the cult favourite Park Ave Princess Matte Waterproof Bronzer.

Next on my shopping mission was of course a trip to Sephora, where I picked up a few more makeup items. First of all I picked up the Sephora Favourites set called ‘Time To Prime’. It’s a little set which has six deluxe samples of priming products, there’s something for your hair, makeup and even your nails. Included in the set is; a line and define lip primer from Bite, a Formula X base coat, the Hourglass Veil Mineral Primer, the Living Proof Prime Style Extender, the Smashbox Shadow Primer and the Urban Decay Subversion Lash Primer.

I’ve had my eye on ‘The System from Formula X’ for quite a while now and decided to finally cave. Inside the box you getting three bottles and then you get to pick a free nail polish to complete the set. There’s ‘Cleanse’ which is a nail cleanser infused with hazel, vitamin E and cucumber to get rid of oil or residue on your nails. You then get the ‘Prime’ base coat and the ‘Shine’ top coat. For my free polish I picked ‘Outrageous’ which is a lavender shade.

I then stopped in the aisle of doom on the way to the checkout and picked up two minis. The first of the two products was the ‘NARS Orgasm/Laguna mini travel set’. Which is exactly what it says on the tin, I’m going to love having this for travel. The second thing I picked up the ‘Coconut Watercolor Cheek Gelee’ from Josie Maran. I’ve heard a lot about these and I was super intrigued to try one of these for myself. It’s a buildable, blendable blush hybrid which combines cream blush and a gel stain.


The last thing I picked up from the USA (other than a lot of souvenirs!) was something from Kate Spade. I knew I wanted to pick up either a new purse or a new handbag when I was in America, but when I left I hadn’t quite decided what. I looked at Michael Kors but nothing caught my eye, so I ended up in Kate Spade on 5th Avenue. The purse design that caught my eye was the ‘Lacey’ and in the end I went for the ‘Mint Mojito’ shade, which also happened to be in the sale!
Share:

Sunday 19 July 2015

Light Summer Bases

I normally wear foundation that has high coverage, as it’s just my personal preference. Nobody likes the feeling of being caked in makeup when the sun is shining, it never feels comfortable. I’ve found three products that over you fairly good coverage, yet don’t feel think or heavy on your skin. These are perfect as the sun starts to come out or for summer holidays.


I’ve spoken about this Tinted Moisturiser from ESPA on my blog before and I’m a huge fan of it. Before trying this product from ESPA I never understood Tinted Moisturiser, as they were always the wrong colour, rubbish coverage and oily formulas. This product literally changed my life! You have to spend a while blending it into your skin, but afterwards it gives you a completely even skintone. It’s buildable, so you can keep adding extra coverage and then I just add a little concealer over blemishes. The best thing is that really leaves your skin GLOWING, it’s beautiful.

I’ve had Maybelline Superstay Better Skin Foundation in my collection for ages. It’s a bit of a special product as it claims to reduce the visible effects of stress, which includes bumps, dullness and redness. From the moment I tried this foundation I loved it, it gives you a really good coverage and it feels so light on the skin. Like the ESPA Tinted Moisturiser, it completely evens out my skintone, covering all my sins whilst giving a radiant finish to the skin. It doesn't settle in my skin either, it glides over both oily and dry areas.

The last product in this little edit, is the Revlon Nearly Naked foundation. This is definitely the most hyped product from the edit too, I remember when it launched and the whirlwind that followed it around the bloggersphere. For me, it’s my least favourite of the three, but it’s still a lovely product. It’s a very light formula, it’s a very runny formula and it needs a lot of buffing into the skin. It gives you very light coverage and it’s very comfortable on the skin too.

What are your favourite base products for summer?
Share:

Saturday 18 July 2015

New from Nip + Fab

Until recently, Nip + Fab was one of those brands that I’d just never had any exposure too. I’d seen them every week in Sainsbury’s as I did my weekly food shop, but I never delved into the shelves and investigated. After trying the original Glycolix Fix pads I was completely hooked, they transformed my decongested skin and offered skin that felt smooth and clean.


Recently Nip + Fab expanded their bestselling Glycolic Fix, which is loved both by customers and industry professionals. They’ve added two new products to the range, which have both been specifically made for nighttime use. They both contain very similar ingredients and they work in similar ways, but you have the choice of two formulations; a pad soaked in liquid and a treatment gel.

Glycolic Fix Night Pads Extreme
The first new product is Glycolic Fix Night Pads Extreme*, which are a stronger, more potent version of the original Glycolix Fix pads. Nip + Fab recommend that you use these pads at nighttime because they contain their highest level of glycolic acid (5%). They are a fantastic overnight treatment that refine pores, brighten your complexion and de-congest your skin. What I love most about these, is that they are so easy to incorporate into your routine, you just have to wipe them around your face and you’re good to go. I’ve been using them twice a week, but if you have sensitive skin you can reduce your usage to one a week. These retail for £14.95 and are available from the Nip + Fab website here.

Glycolic Fix Overnight Purifying Gel
The second new product from Nip + Fab is the Glycolic Fix Overnight Purifying Gel*, which is a clarifying treatment for dull and oily skin. This is a gel formula containing glycolic acid, salicylic acid and niacinamide, which are battling to improve the texture of your skin and also fight acne. You simply cleanse your skin and then use this as a nighttime treatment after cleansing. This product also retails for £14.95 from the Nip + Fab website here.

The Glycolix Fix range from Nip + Fab has completely become a staple in my routine. They’ve vastly improved the condition of my skin and they are so easy to implement into your night time schedule. Before the Glycolix Fix range from Nip + Fab I was pretty scared about using acids in my skincare, but these have made it all really simple. I’ve had no weird reactions to the products, you just need to make sure you use an SPF the next day!
Share:

Friday 17 July 2015

Inside My Blusher Collection

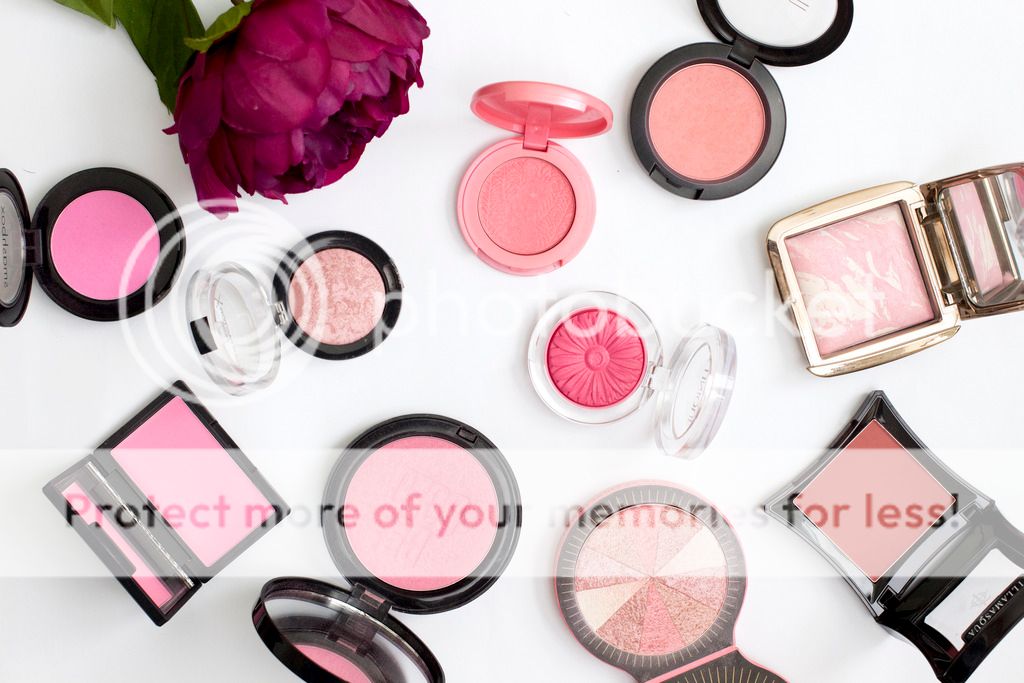
You've probably already guessed, but today's blog post is dedicated to my blusher collection. I always thought that I was really bad at buying the same colour, I often get attracted to the pinky, berry hues! However, as you can see below, when they are all laid out together, all of these blushers are completely different! Lets take a peek inside my blusher collection... 


I'll be first to admit that this isn't every single blusher in my makeup drawers, which is a bit embarrassing. However, it's only in recent months that I've become obsessed with blusher, so most of these are pretty new additions to my collection. That doesn't make the growing collection acceptable, but it does mean that most of these blushers do get some use.

Blusher tends to be one of those items that I really invest in, as I feel like the products last a long time and I get a lot of use out of them. What I love about blusher is it’s so versatile and you can use it a whole host of different ways. The blushers I tend to buy fall into a few different categories:

The Highlighting Blusher
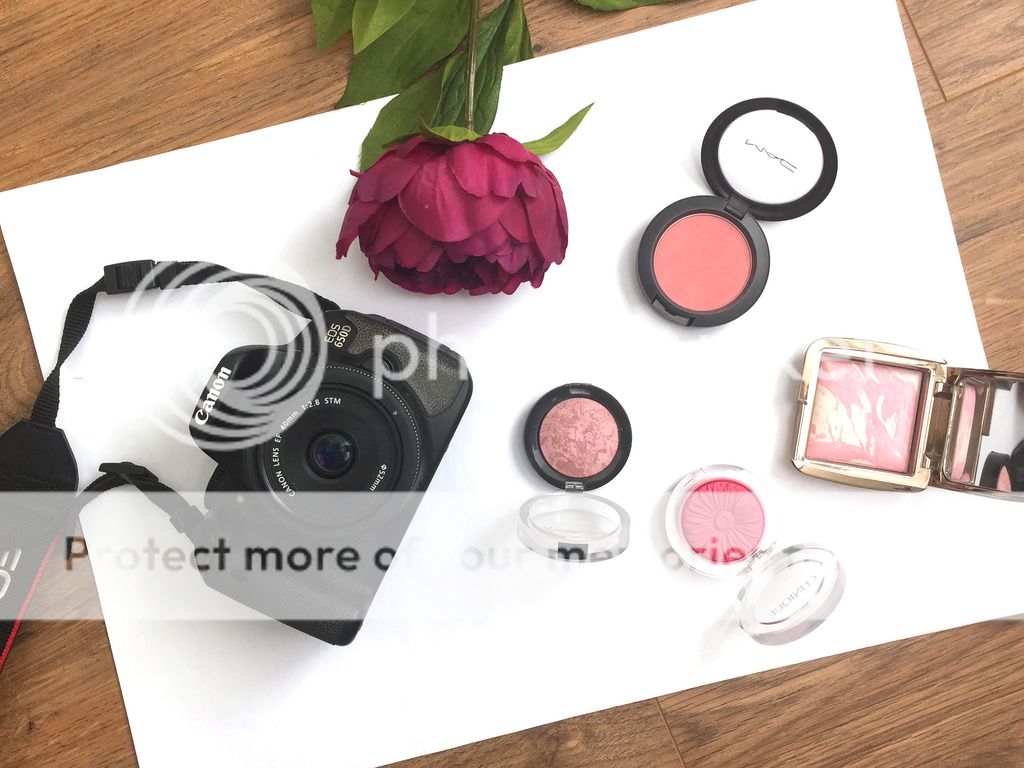
I have a few blushers that I nickname ‘Highlighting Blushers’. These are probably my biggest weakness, there's something far too pretty about a sparkle filled blusher. There are four pictured above; the Hourglass Ambient Lighting Blusher in Ethereal, the Maybelline Creme Puff Blush in Gorgeous Berries, the Soap & Glory Love At First Blush and the Bobbi Brown Be Bold Compact. These are normally top picks of mine when I travel and they are great when you're in a rush, as they are great multi-purpose products. When I'm at home I tend to layer these with products that have more pigmentation, to create a bit of a contoured look.

The Highly Pigmented Blusher
Other blushers that I tend to go for include blushers that are very pigmented. I like a blusher where a little goes a long way, where you can build from something subtle to something more significant. Examples of these pictured above include Illamasqua’s Powder Blusher in Beg, this is so strongly pigmented, you barely have to touch your brush in the powder! Another example is the Tarte Amazonian Clay Blushers, I have a limited edition shade called ‘Thankful’.  The formula of the Tarte blushers is just gorgeous, they are buttery and blend beautifully, pigmentation may aswell be their middle name!

The Cream Blusher
The Cream Blusher is another weakness of mine, I particularly enjoy using these in the Spring as they add a really nice and dewy finish to your cheeks. My collection of cream blushers is quite extensive, although the only one pictured here is the Clinique Cheek Pop in Berry Pop. I love everything about this Clinique product as it’s pigmented, dewy and it’s so blendable. The packaging makes it great for travelling or for in your handbag too! Another favourite of mine are the Topshop cream blushers, I particularly like their polka dot packaging.

I’d love to know what you look for in a blusher, what is your favourite formula?
Share:
© Hope, Freedom, Love | All rights reserved.
Blog Layout Created by pipdig